Difference between revisions of "Hosting Modules"
(→Setup the DirectAdmin Server(s)) |
(→Sub Domain Hosting) |
||
| (95 intermediate revisions by 3 users not shown) | |||
| Line 1: | Line 1: | ||
| + | __NOTOC__ | ||
| + | ==Table of Contents== | ||
| + | # [[#Hosting_Configuration_-_Read_First.21|Hosting Configuration - Read First!]] | ||
| + | # [[Cast_Control_Specific_Configuration|Cast Control Module]] | ||
| + | # [[CentovaCast_Specific_Configuration|CentovaCast Module]] | ||
| + | # [[Cloudmin_Specific_Configuration|CloudMin Module]] | ||
| + | # [[cPanel_Specific_Configuration|cPanel Module]] | ||
| + | # [[cPanel_with_WHMSonic|cPanel with WHMSonic Module]] | ||
| + | # [[DirectAdmin_Specific_Configuration|DirectAdmin Module]] | ||
| + | # [[DotNetPanel_Specific_Configuration|DotNetPanel Module]] | ||
| + | # [[eNom_Hosting_Specific_Configuration|eNom Hosting Module]] | ||
| + | # [[Ensim_Specific_Configuration|Ensim Module]] | ||
| + | # [[GameCP_Hosting_Specific_Configuration|GameCP Module]] | ||
| + | # [[Helm_Specific_Configuration|Helm Module]] | ||
| + | # [[Hostopia_Specific_Configuration|Hostopia Module]] | ||
| + | # [[HyperVM_Specific_Configuration|HyperVM Module]] | ||
| + | # [[Interworx_Specific_Configuration|Interworx Module]] | ||
| + | # [[ISP Manager_Specific_Configuration|ISP Manager Module]] | ||
| + | # [[Kloxo_Specific_Configuration|LxAdmin/Kloxo Module]] | ||
| + | # [[Plesk_Specific_Configuration|Plesk Module]] | ||
| + | # [[SolusVM_Specific_Configuration|SolusVM Module]] | ||
| + | # [[TCAdmin_Specific_Configuration|TCAdmin Module]] | ||
| + | # [[Teamspeak_Specific_Configuration|Teamspeak Module]] | ||
| + | # [[Teamspeak_3_Specific_Configuration|Teamspeak 3 Module]] | ||
| + | # [[VDS Manager_Specific_Configuration|VDS Manager Module]] | ||
| + | # [[VirtualMin_Specific_Configuration|VirtualMin Module]] | ||
| + | # [[VPSnet_Specific_Configuration|VPS.net Module]] | ||
| + | # [[WHMPHP_Specific_Configuration| WHMPHP Module]] | ||
| + | # [[Zervex_Specific_Configuration|Zervex Module]] | ||
| + | # [[#Alternate_Order_Wizard|Alternate Order Wizard]] | ||
| + | # [[#Sub_Domain_Hosting|Sub Domain Hosting]] | ||
| + | # [[#Load_Balancing|Load Balancing]] | ||
| + | |||
== Hosting Configuration - Read First! == | == Hosting Configuration - Read First! == | ||
In the AWBS Configuration, Module Setup page, make sure you have enabled all hosting control panels that you will use/configure. | In the AWBS Configuration, Module Setup page, make sure you have enabled all hosting control panels that you will use/configure. | ||
| Line 6: | Line 39: | ||
'''>>Do the following in order to setup the structure for your hosting configuration properly.<<''' | '''>>Do the following in order to setup the structure for your hosting configuration properly.<<''' | ||
| − | + | #Setup server groups. ([[Media:ServerGroup.png|''Screenshot'']])<br /> Use the server groups to form load balancing groups and/or categories. Example: put all cpanel servers in group1 and all helm servers in group2.<br />''Note: You must have at least one server group.'' | |
| − | + | #Setup your server(s). Add all hosting servers you will be setting up client hosting on. Select the correct server group. Refer to the specific control panel configuration pages for detailed help for your server type. | |
| − | ''Note: You must have at least one server group.'' | + | #Go back to server groups and select a default server for each group and save. Save the record even if the correct group shows up. |
| − | + | #Setup hosting package types. These types will categorize your hosting plans in groups to be displayed together on a web page for ordering. Create a hosting package type for each web display page you want on your site. <br />''Hint: Once you have setup a type, you can click to edit and you will find a link to use on your menu for that type's display page.'' | |
| − | + | #Setup your hosting plans in the hosting plan setup page. Refer to the hosting control panel specific configuration pages for detailed help for setting up your plans correctly. | |
| − | + | ||
| − | + | ||
| − | + | ||
| − | + | ||
| − | + | ||
| − | Hint: Once you have setup a type, you can click to edit and you will find a link to use on your menu for that type's display page. | + | |
| − | + | ||
| − | + | ||
'''TEST''' | '''TEST''' | ||
| − | Place a test order for hosting using your test user account (create an account for testing if you did not already). Log back in as admin, go to the job queue. Your new order should be in the open job queue if you have 'Process all hosting orders immediately' set to True in the System Options area. The new order will show up in the pending queue if you have 'Process all hosting orders immediately' set to False in the System Options. | + | *Place a test order for hosting using your test user account (create an account for testing if you did not already). |
| − | + | *Log back in as admin, go to the job queue. Your new order should be in the open job queue if you have 'Process all hosting orders immediately' set to True in the System Options area. The new order will show up in the pending queue if you have 'Process all hosting orders immediately' set to False in the System Options. | |
| − | Click the run link to the left of the new order in the job queue to manually process the order. A popup window will open and display the progress of the communication to the hosting server. If all is configured properly, the hosting account will be created on the hosting server and the user account will receive an email notifying them their hosting account is active and give them login details as per the email template you have assigned to the hosting plan in the hosting plan configuration page. | + | *Click the run link to the left of the new order in the job queue to manually process the order. A popup window will open and display the progress of the communication to the hosting server. If all is configured properly, the hosting account will be created on the hosting server and the user account will receive an email notifying them their hosting account is active and give them login details as per the email template you have assigned to the hosting plan in the hosting plan configuration page. |
If there are any errors, you can click to edit the job and check the 'return' field for any errors reported by the hosting server's API. To get more information for troubleshooting, you can place the job queue in debug mode by clicking the debug mode link at the top of the job queue, then run the job again. Details of the communication will appear in the popup window when the job runs in debug mode. It is recommended to leave debug mode set to off unless you need to troubleshoot a problem/error. | If there are any errors, you can click to edit the job and check the 'return' field for any errors reported by the hosting server's API. To get more information for troubleshooting, you can place the job queue in debug mode by clicking the debug mode link at the top of the job queue, then run the job again. Details of the communication will appear in the popup window when the job runs in debug mode. It is recommended to leave debug mode set to off unless you need to troubleshoot a problem/error. | ||
| − | == | + | == Alternate Order Wizard == |
| − | + | (Note: Alternate Order Wizard feature available version 2.8.0 and newer) | |
| − | + | ||
| − | + | The alternate order wizard can be enabled for either hosting or dedicated server ordering (not both). | |
| − | + | The alternate order wizard uses the AWBS API, to use it you'll need to add your server's main IP to the Extended System Configuration, remote_list setting.<br /> | |
| − | + | (''If you see 'Domain not available' for all domain searches, you have not configured the API for access'') | |
| − | + | ||
| − | ( | + | |
| − | + | Enable the alternate order wizard on a per package basis by editing each hosting package you want to use the alternate order wizard and set the Use Alternate Order Wizard setting to True and save. | |
| − | + | Enable the alternate order wizard on a per type basis by editing the hosting package type and set Use Alternate Order Wizard to True and save. | |
| − | + | ||
| − | + | ||
| − | + | ||
| − | + | ||
| − | + | ||
| − | + | ||
| − | + | ||
| − | + | ||
| − | + | ||
| − | + | ||
| − | + | ||
| − | + | ||
| − | + | ||
| − | + | ||
| − | + | ||
| − | + | ||
| − | + | ||
| − | + | ||
| − | + | Menu links are available both in the hosting package type setup page and hosting package setup pages to use on your website or menu as desired. | |
| − | |||
| − | + | There are 3 settings in the order.php engine file.<br /> | |
| + | $carton = "0"; // 0 - send customers right to the payment page (skip the cart), 1 - send orders to the cart | ||
| + | $apiurl = ""; //(no trailing slash) if blank will use this url (complete if using a different url than your AWBS site) | ||
| + | $emptycart = "1"; //Empty the cart prior to adding the new package? This will remove all items from the cart | ||
| − | |||
| − | + | '''''Note:''' | |
| + | The order.php engine file, template and includes are all '''open source''', edit as desired!'' | ||
| − | + | ==Sub Domain Hosting == | |
| + | Configuration >> Sub-Domain Hosting Setup >> [Add Record] | ||
| − | + | Setup any domains you want sub domain hosting ordered for. | |
| − | + | For any hosting packages you want to offer the sub-domain hosting for: | |
| + | Configuration >> Hosting Package Setup >> select desired package(s) | ||
| − | + | Check the checkbox that says: | |
| + | Sub-Domain Ordering ALLOWED | ||
| − | + | ==Load Balancing == | |
| + | Load balancing is used to have hosting accounts provisioned equally among a group of servers. | ||
| − | + | To activate load balancing for any server group, check the box that says: | |
| + | Activate Load Balancing | ||
| + | in the Configuration >> Server Groups >> [desired server group] setup page. | ||
| − | + | AWBS will take new orders and check for the server in that group with the least number of accounts on it and provision to that server. | |
| − | + | ''Notes:'' | |
| + | Control panel types that support over bandwidth billing will pull the account numbers from the server stats data pulled from the servers. | ||
| + | Control panel types that do not support the server stats data gathering will pull the account numbers from AWBS's hosting manager. | ||
| − | + | === Alternate use of the Load Balancing system === | |
| + | This will provision accounts based on user selection of '''server location''' (datacenter). | ||
| − | |||
| − | + | 1) Assign all servers to the proper server location (Create locations as needed and note the ID for use below) | |
| + | ''Configuration >> Server Locations'' | ||
| − | + | 2) Custom Field Management (Add new)<br /> | |
| + | - Name: serverlocation<br /> | ||
| + | - Type: Pulldown<br /> | ||
| + | - Text Display: Datacenter Choice<br /> | ||
| + | - Default Value: |9999:No Preference|1:Sarasota DC|2:Tampa DC|3:Dallas DC|4:Seattle DC|<br /> | ||
| + | These are your server locations as set in AWBS. <br />You will need your servers in your server groups correctly assigned to locations and Load Balancing turned on.<br /> | ||
| + | The format is: |location id number from AWBS:Name shown to customer|<br /><br /> | ||
| − | + | - Response Required<br /> | |
| + | - Visible When Ordering<br /> | ||
| − | + | 3) Assign the new custom field to packages as needed. | |
| − | + | Create as many custom fields with the same configuration but with the options set as needed as assign to hosting packages. | |
| − | + | ||
| − | + | ||
| − | + | ||
| − | + | ||
| − | + | ||
| − | + | ||
| − | + | ||
| − | + | ||
| − | + | ||
| − | + | ||
| − | + | ||
| − | + | ||
| − | + | ||
| − | + | ||
| − | + | ||
| − | + | ||
| − | + | ||
| − | + | ||
| − | + | ||
| − | + | ||
| − | + | ||
| − | + | ||
| − | + | ||
| − | + | ||
| − | + | ||
| − | + | ||
| − | + | ||
| − | + | ||
| − | + | ||
| − | + | ||
| − | + | ||
| − | + | ||
| − | + | ||
| − | + | ||
| − | + | ||
| − | + | ||
| − | + | ||
| − | + | ||
| − | + | ||
| − | + | ||
| − | + | ||
| − | + | ||
| − | + | ||
| − | + | ||
| − | + | ||
| − | + | ||
| − | + | ||
| − | + | ||
| − | + | ||
| − | + | ||
| − | + | ||
| − | + | ||
| − | + | ||
| − | + | ||
| − | + | ||
| − | + | ||
| − | + | ||
| − | + | ||
| − | + | ||
| − | + | ||
| − | + | ||
| − | + | ||
| − | + | ||
| − | + | ||
| − | + | ||
| − | + | ||
| − | + | ||
| − | + | ||
| − | + | ||
| − | + | ||
| − | + | ||
| − | + | ||
| − | + | ||
| − | + | ||
| − | + | ||
| − | + | ||
| − | + | ||
| − | + | ||
| − | + | ||
| − | + | ||
| − | + | ||
| − | + | ||
| − | + | ||
| − | + | ||
| − | + | ||
| − | + | ||
| − | + | ||
| − | + | ||
| − | + | ||
| − | + | ||
| − | + | ||
| − | + | ||
Latest revision as of 09:48, May 27, 2020
Table of Contents
- Hosting Configuration - Read First!
- Cast Control Module
- CentovaCast Module
- CloudMin Module
- cPanel Module
- cPanel with WHMSonic Module
- DirectAdmin Module
- DotNetPanel Module
- eNom Hosting Module
- Ensim Module
- GameCP Module
- Helm Module
- Hostopia Module
- HyperVM Module
- Interworx Module
- ISP Manager Module
- LxAdmin/Kloxo Module
- Plesk Module
- SolusVM Module
- TCAdmin Module
- Teamspeak Module
- Teamspeak 3 Module
- VDS Manager Module
- VirtualMin Module
- VPS.net Module
- WHMPHP Module
- Zervex Module
- Alternate Order Wizard
- Sub Domain Hosting
- Load Balancing
Hosting Configuration - Read First!
In the AWBS Configuration, Module Setup page, make sure you have enabled all hosting control panels that you will use/configure.
In the AWBS Configuration, System Options page, set all preferences as desired for your company.
>>Do the following in order to setup the structure for your hosting configuration properly.<<
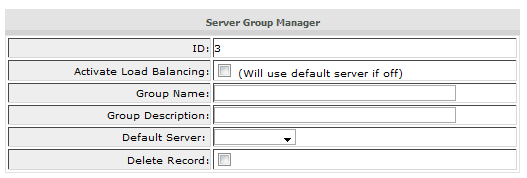
- Setup server groups. (Screenshot)
Use the server groups to form load balancing groups and/or categories. Example: put all cpanel servers in group1 and all helm servers in group2.
Note: You must have at least one server group. - Setup your server(s). Add all hosting servers you will be setting up client hosting on. Select the correct server group. Refer to the specific control panel configuration pages for detailed help for your server type.
- Go back to server groups and select a default server for each group and save. Save the record even if the correct group shows up.
- Setup hosting package types. These types will categorize your hosting plans in groups to be displayed together on a web page for ordering. Create a hosting package type for each web display page you want on your site.
Hint: Once you have setup a type, you can click to edit and you will find a link to use on your menu for that type's display page. - Setup your hosting plans in the hosting plan setup page. Refer to the hosting control panel specific configuration pages for detailed help for setting up your plans correctly.
TEST
- Place a test order for hosting using your test user account (create an account for testing if you did not already).
- Log back in as admin, go to the job queue. Your new order should be in the open job queue if you have 'Process all hosting orders immediately' set to True in the System Options area. The new order will show up in the pending queue if you have 'Process all hosting orders immediately' set to False in the System Options.
- Click the run link to the left of the new order in the job queue to manually process the order. A popup window will open and display the progress of the communication to the hosting server. If all is configured properly, the hosting account will be created on the hosting server and the user account will receive an email notifying them their hosting account is active and give them login details as per the email template you have assigned to the hosting plan in the hosting plan configuration page.
If there are any errors, you can click to edit the job and check the 'return' field for any errors reported by the hosting server's API. To get more information for troubleshooting, you can place the job queue in debug mode by clicking the debug mode link at the top of the job queue, then run the job again. Details of the communication will appear in the popup window when the job runs in debug mode. It is recommended to leave debug mode set to off unless you need to troubleshoot a problem/error.
Alternate Order Wizard
(Note: Alternate Order Wizard feature available version 2.8.0 and newer)
The alternate order wizard can be enabled for either hosting or dedicated server ordering (not both).
The alternate order wizard uses the AWBS API, to use it you'll need to add your server's main IP to the Extended System Configuration, remote_list setting.
(If you see 'Domain not available' for all domain searches, you have not configured the API for access)
Enable the alternate order wizard on a per package basis by editing each hosting package you want to use the alternate order wizard and set the Use Alternate Order Wizard setting to True and save.
Enable the alternate order wizard on a per type basis by editing the hosting package type and set Use Alternate Order Wizard to True and save.
Menu links are available both in the hosting package type setup page and hosting package setup pages to use on your website or menu as desired.
There are 3 settings in the order.php engine file.
$carton = "0"; // 0 - send customers right to the payment page (skip the cart), 1 - send orders to the cart
$apiurl = ""; //(no trailing slash) if blank will use this url (complete if using a different url than your AWBS site)
$emptycart = "1"; //Empty the cart prior to adding the new package? This will remove all items from the cart
Note:
The order.php engine file, template and includes are all open source, edit as desired!
Sub Domain Hosting
Configuration >> Sub-Domain Hosting Setup >> [Add Record]
Setup any domains you want sub domain hosting ordered for.
For any hosting packages you want to offer the sub-domain hosting for: Configuration >> Hosting Package Setup >> select desired package(s)
Check the checkbox that says: Sub-Domain Ordering ALLOWED
Load Balancing
Load balancing is used to have hosting accounts provisioned equally among a group of servers.
To activate load balancing for any server group, check the box that says: Activate Load Balancing in the Configuration >> Server Groups >> [desired server group] setup page.
AWBS will take new orders and check for the server in that group with the least number of accounts on it and provision to that server.
Notes: Control panel types that support over bandwidth billing will pull the account numbers from the server stats data pulled from the servers. Control panel types that do not support the server stats data gathering will pull the account numbers from AWBS's hosting manager.
Alternate use of the Load Balancing system
This will provision accounts based on user selection of server location (datacenter).
1) Assign all servers to the proper server location (Create locations as needed and note the ID for use below)
Configuration >> Server Locations
2) Custom Field Management (Add new)
- Name: serverlocation
- Type: Pulldown
- Text Display: Datacenter Choice
- Default Value: |9999:No Preference|1:Sarasota DC|2:Tampa DC|3:Dallas DC|4:Seattle DC|
These are your server locations as set in AWBS.
You will need your servers in your server groups correctly assigned to locations and Load Balancing turned on.
The format is: |location id number from AWBS:Name shown to customer|
- Response Required
- Visible When Ordering
3) Assign the new custom field to packages as needed.
Create as many custom fields with the same configuration but with the options set as needed as assign to hosting packages.