Easy cPanel Install
Contents
[hide]Easy cPanel Install
(Note: this page is based upon the cpanel x theme. Icons and links may have different but similar names/icons if you have another cpanel skin)
Login to cPanel
Create Database
- Click the MySQL Databases icon:

- In the Current Databases: section enter the desired database name in the New Database field:

- Click the Create Database button

- Click the Go Back link.
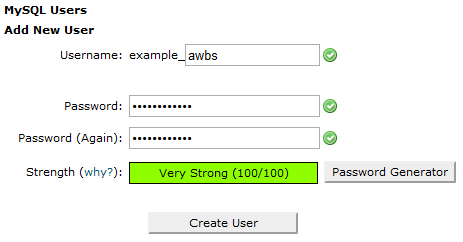
- In the Current Users section enter the desired username and password in the appropriate fields:

- Click the Create User button:

- Click the Go Back link.
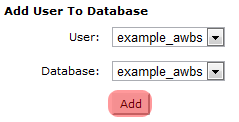
- In the Add Users to Your Databases section, select the database you just created and the user you have just created in the dropdown boxes, then click the Add button

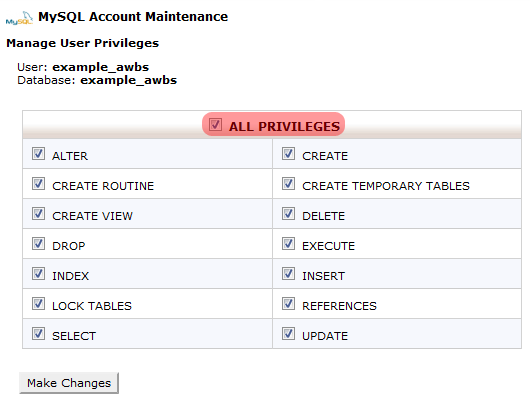
Verify that the ALL checkbox is checked for privileges:
- Click the Make Changes button.
- Document your db name, username and password for future reference.
Upload files
- Click on the File Manager icon.
- Navigate into the public_html directory by clicking on the folder icon to the left of 'public_html'.
- Click on Upload file(s).
- Click the first Browse... button, select the full install AWBS zip file that you downloaded from the AWBS download area.
- Click the second Browse... button, select the license.dat file you got when you purchased AWBS.
- Click the Upload button.
When the upload is complete, click on the filename of the AWBS full install zip. In the top right pane, click Extract File Contents. Once the zip has been extracted, you can delete the zip file.
Edit dbconfig.php file
- Navigate into the includes directory by clicking the folder icon beside includes.
- Click on the filename dbconfig.php. In the top right pane, click Edit File.
- Remove the following line:
$needs_edit=1; - Edit these lines with your database information:
$dbusername
$dbpassword
$dbdatabase
(Enter your information between the quotes in each line, overwriting the sample data that is there) - Edit this line with your correct path to your files:
$workdir
Most cPanel servers paths would be like this:/home/userdir/public_html Substitute 'userdir' with your cPanel login username. - Edit the following line with your domain name preceded by a dot:
$cookie_domain - Click the Save button to save changes to the dbconfig.php file.
- Close the edit window.
Run the install script
Open a new browser window. Surf to http://[your_AWBS_domain]/install/install.php (Substitute your domain name for [your_AWBS_domain])
Note: You must have read the AWBS license agreement and agree to abide by the terms to continue with the install.
Once you have read the license agreement, Check the box and click "Begin Install"
Welcome: (License Check)
The next step is to verify your license. You should see something like the following:
License Status: Active


Your licensing has been verified and your system is now activated.
Once the license has been verified click the box at the bottom of the page labeled "Continue With Install"
Note: Error 5 indicates the license.dat file is missing. Be sure you have uploaded the license.dat file to the same directory that you uploaded the AWBS files.
Error 3 indicates your server cannot reach our license database via port 80. Ensure your server has internet access via port 80.
Step 1:
The next step is to check your php.ini configuration settings and make sure everything is ready to go. You should see something like the following:
Safe Mode:  OK
Register Globals:  OK
Session Cookies:  OK
Compiled Curl:  OK


Environment Tests appear OK. Let's continue.....
Once the above information has been tested, click the box at the bottom of the page labeled "Continue to step 2"
Step 2:
The next step is to check your database settings and make sure everything is ready to go. You should see something like the following:
DB User/Pass:  yourdbusername/yourdbpassword
Database Name:  yourdbname
DB User/Pass:  OK
DB Connect Test:  OK
Database Exists:  OK


Database Tests appear OK. Let's continue.....
Once the above information has been tested, click the box at the bottom of the page labeled "Continue to step 3"
Step 3:
The next step is to check your database structure and make sure the database is ready to go. You should see something like the following:
Database Structure Creation appears OK. Let's continue....
Once the above information has been tested, click the box at the bottom of the page labeled "Continue to step 4"
Step 4:
The next step is to populate the database with your company's information. Fill in the following info and then continue. You will need to fill out the information like shown below:
Company Information
Company Name:
Company Address1:
Company Address2:
Company City:
Company State:
Company Zip:
Company Country:
Company Phone:
Company Fax:
Admin Email:
Support Email:
Sales Email:
Billing Email:
Server Settings
Edit the licensed urls if necessary. Add/Remove the www. as needed/desired, edit http and https as needed, and add any subdirectory information to the url. Do NOT add a trailing slash. If you don't have a secure site, use the same URL in both fields.
Do NOT enter a URL that does not contain your AWBS files! The URL must point to where you have uploaded the files. If you alter the licensed domain name or subdomain, it will not match your license and you will have license errors.
Non-Secure URL: examples: http://[your_licensed_domain_name]/directory or http://[your_licensed_domain_name] or http://[your_licensed_subdomain]
Note: The URL above should reflect the URL you surf to to get to your AWBS site.
Server Admin
This is where you will establish the 'super admin' account and login. The password can be changed later.
Remember this login!
Admin First Name:
Admin Last Name:
Admin Username:
Admin Password:
Once you have the above information filled out as needed, click the box at the bottom of the page labeled "Continue to step 5"
Step 5:
AWBS installation is complete!
At this point, the basic install is complete.
Click the box labeled "Finish Install"
Delete the install directory
Go back to your cPanel browser window. Click on the Up one level link. Click on the install directory name (not icon). In the top right pane, click to delete this folder and all files under it link.
Secure the admin, includes and tools directories
- In cPanel, close the file manager window. Click the Password Protect Directories icon.
- Click on the admin directory name (not icon)
- Check the Directory requires a password to access via the web check box, (you must check this to activate password protection).
- Enter some text as desired in the Protected Resource Name (will display in browser's password mask)
- Click the Save button.
- Click Go Back
- Scroll down to the Active Users section.
- Enter a username in the User Name field and a password in the Password field.
Remember this login will be needed by all who enter the protected directory. This will include any AWBS users who you give any admin rights to.
Additional users can be added. Click the Add/modify authorized user button. Repeat above for the includes and tools directories.
Configure your cron jobs
- From your cPanel home page, click on the cron jobs icon.
- Click the Advanced (Unix Style) button.
- Enter an email address you will be able to check in the Please enter an email address where the cron output will be sent field.
- Edit the Minute and Hour fields so that you have scheduled for once per day at a low traffic time on your server. Example: If you enter 0 for Minute and 5 for Hour, this will run the updtransfers.php cron at 5:00 AM each day.
- Enter php -f /home/userdir/public_html/tools/updtransfers.php in the Command field. (Substitute your cPanel username in place of 'userdir' and do not paste the quotes)
- Click the Commit Changes button.
- Configure the updateexp.php and invoice_cron.php files also for once per day, but at a different time than the updtransfers.php cron. You can copy the command field from the original, then just edit the file name updtransfers.php to updateexp.php and change the Hour, then save.
- Repeat for invoice_cron.php.
NOTE: It is advised to run the invoice_cron.php after the updateexp.php and updtransfers.php files each day. - Repeat for master_cron.php, however change the Minute field to */15 and the Hour field to *. This will run the master_cron.php every 15 minutes.
Once you are satisfied your crons are functioning properly (after configuring and testing your AWBS install), you can remove your email address to minimize your incoming emails.
Installation is complete, now you can login as super admin and start configuring, customizing and testing.